Well. First, very proud of my new knowledge, I wrote down “sudo apt install restic” … Nothing.
Then I found Install restic on Raspberry Pi using the Snap Store | Snapcraft. I obeyed, and after > sudo snap install restic --classic, I obtained > error: snap “restic” is not available on stable for this architecture (armhf) > but exists on other architectures (amd64, arm64).
Sorry, betatester77, but I don’t understand “the arm Binary” and worse, I can’t find some thing like that on Releases · restic/restic · GitHub.
Anyway, thanks for trying helping.
It depends a little on what you have installed but this is probably it. The main advantage of doing this manually is that, especially in the Debian-based repos you will get very old versions of restic. And as @betatester77 said above, restic can self-update from then on vs. getting updates when you use apt upgrade.
When setting up standalone binaries I tend to use sudo install <binary> /usr/local/bin rather than copying and (trying to) remember to set the correct permissions.
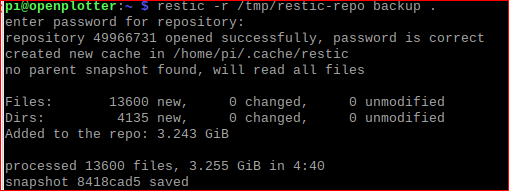
THANKS !!! It worked !!! (at least no black smoke from the RPi4, and it asked for a password).
Then I went to restic · Backups done right!, and began to copy down. But I never could see the password, not even know if the RPi is getting something.
It seems also that I can’t choose where can be the depository ?
Sorry, but I didn’t find anwers in the FAQ
Well it seems as though you now have restic running so you can play with it! A repository is just a simple, empty folder when you start. The init command then turns it into a restic repository protected by whatever password you choose. In the above screenshot it seems like you simply entered two different passwords.
Try this:
mkdir test-source touch test-source/example.file mkdir test-repo restic -r test-repo init (enter “123” twice as the password and then use “123” in the subsequent commands) restic -r test-repo backup test-source restic -r test-repo snapshots
Yep ! It works, at last (I am on it since tuesday a week ago). Thanks to you and others contributors, very patient guis, for sure. But is it NORMAL that I can’t see the password ?
A repository is simply a folder. If you create and populate /home/user/repo for instance, you can simply move it like a folder, e.g.: mv /home/user/repo /srv .
OK. It seems I already backuped, and not only created the depositotory.
I understand that the created cache is to register where is the depository ?
**Now, I will try ** mv /home/user/repo /srv to /media/pi/1108-1358"** **or** **mv /home/user/repo /srv to /media/pi/Volume de 1,0 To" ?
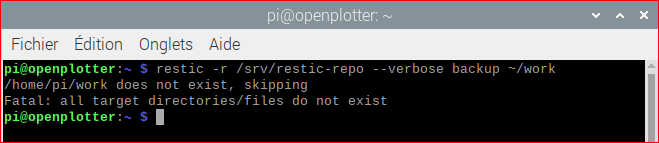
Hi nicnab ! I transfered restic-repo to the external disc dedicated to back-ups. Then I tried to create a new back-up …
OK, next tuesday I will meet again the Linux loonies than explained to me to back up via restic, to make them solve all thoses problems.
Thanks a lot again for your help and the help of every body.
Certainly. You’re the pro, not I. But writing >
*> * > restic -r /srv/restic-repo --verbose backup ~/work,, I am just applying Backing up — restic 0.13.1 documentation, and nothing else. I will sail in the beginning of june, I would like to have the RPi4 operating, fully. I received the first elements in november, and since I am on it, discovering pieces are lacking, then the need of directories and so on. Not so easy. But still on it.
The command in the tutorial is just an example that backups a directory called “Work” in your home directory (the ~ sign is short for your home directory).
So of course you should not use ~/Work if that’s not the directory you want to backup. Instead use the path where the data you want to backup resides in.
If you say.
Personnaly, I just want to backup the whole system and datas, from a external disc to another one. Friends said “you’d better use a incremental backup, so try restic”. That what I am trying.
I’ve been back again to my friends Linux-pro in the town of Quimper. We managed to make a end to this. I’ve written down what to do, not to forget. In french, sorry.